best reviews metal detectors for gold
Interesting information about treasure hunters
One of the advantages of impulse metal detectors is the ease of making search coils for them. With this simple coil, pulsed metal detectors have a good detection depth. This article will describe the simplest and most accessible ways of making search coils for pulse metal detectors with their own hands.
The coils, made by the following methods of manufacture, are suitable for almost all popular schemes of impulse metal detectors (Koshche, Clone, Trucker, Pirate, etc.).
From the wire twisted steam, you can get a great sensor for pulse metal detectors. Such a coil, wakes to have a depth of search more than 1.5 meters and have a good sensitivity to small objects (coins, rings, etc.). To make it you need a wire twisted steam (such a wire is used for internet connection and is on sale in any market and computer store). The wire consists of 4 retinue pairs of wires without a screen.
The coils, made by the following methods of manufacture, are suitable for almost all popular schemes of impulse metal detectors (Koshche, Clone, Trucker, Pirate, etc.).
Pulse metal detector coil made of twisted vapor
From the wire twisted steam, you can get a great sensor for pulse metal detectors. Such a coil, wakes to have a depth of search more than 1.5 meters and have a good sensitivity to small objects (coins, rings, etc.). To make it you need a wire twisted steam (such a wire is used for internet connection and is on sale in any market and computer store). The wire consists of 4 retinue pairs of wires without a screen.
The sequence of making a coil for a pulsed metal detector, from the wire twisted steam:
Cut off 2.7 meters of wire.
We find the middle of our piece (135 cm) and celebrate it. Then we measure from it 41 cm and also put marks.
We connect the wire by marks in the ring, as shown below in the picture, and fix it with tape or tape.
Now we begin to round the ends around the ring. We do it simultaneously on both sides, and make sure that the revolutions lie down tightly, without gaps. As a result, you get a ring of 3 rounds. Here’s how you should:
The resulting ring is fixed with tape. And the ends of our coil bend inwards.
Then we clean the insulation of the wires, and we shave our wires, in the following sequence:
Places of spikes are isolated with thermotubules or tape.
To remove the coil, take a wire of 2 to 0.5 or 2.75 mm in rubber insulation, 1.2 meters long, and solder it to the remaining ends of the coil and also isolate.
Then you need to find a suitable case for the coil, it can be bought ready, or pick up a suitable diameter plastic plate, etc.
We put the coil in the body and fix it there with thermoglue, also fix our adhesions and wires on the conclusions. You should get something similar:
Then the case is glued, or if you used a plastic plate or pallet, it is better to fill it with epoxy resin, it will give your design additional rigidity. Before you paste the body, or fill it with epoxy resin, it is better to conduct intermediate health tests! Since after the glue, there is nothing to fix!
To attach the coil to the bar of the metal detector, you can use this bracket (it is quite inexpensive), or make its own likeness.
By the second end of the wire, we solder the connector, and our coil is ready for use.
In the trial of such a coil from the metal detectors of Koschi 5I the following data were obtained:
Iron Gate - 190 cm
Casca - 85 cm
Coin 5 braids of the USSR - 30 cm.
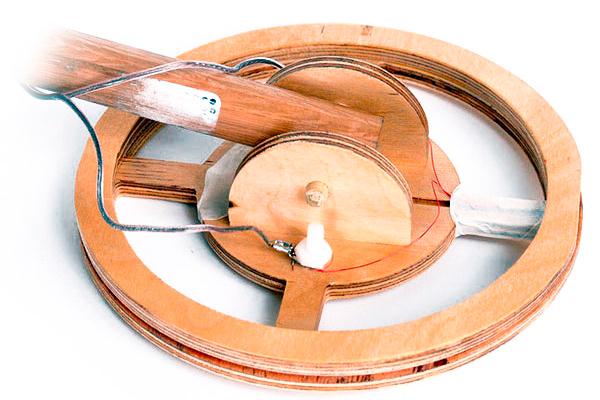
A large coil for the pulsed metal detector with its own hands.
Here we will describe the way of making a depth coil of 50-70 cm, for pulse metal detectors. This coil is good for finding large metal targets at great depth, but it is not suitable for finding fine metal.
So, the process of making a coil for pulse metal detectors:
We make a cure. To do this in any graphic program, we lick our sleuth, and print it in the amount of 1:1.
With the help of a lectern, draw the outline of our coil on a sheet of plywood or DSP.
We enter the perimeter of nails, or twist screws (screws must be wrapped with tape, so that they do not scratch the wire), in a step of 5 - 10 cm.
Then wind on them winding (for the metal detector Clone 18 -19 turns) winding enamel wire 0.7-0.8mm, you can also use a multi-dwelling insulated wire, but then the weight of the coil will turn out a little more.
Between the cloves, winding pull cable ties, or tape. And smear the free areas with epoxy resin.
Cut off 2.7 meters of wire.
We find the middle of our piece (135 cm) and celebrate it. Then we measure from it 41 cm and also put marks.
We connect the wire by marks in the ring, as shown below in the picture, and fix it with tape or tape.
Now we begin to round the ends around the ring. We do it simultaneously on both sides, and make sure that the revolutions lie down tightly, without gaps. As a result, you get a ring of 3 rounds. Here’s how you should:
The resulting ring is fixed with tape. And the ends of our coil bend inwards.
Then we clean the insulation of the wires, and we shave our wires, in the following sequence:
Places of spikes are isolated with thermotubules or tape.
To remove the coil, take a wire of 2 to 0.5 or 2.75 mm in rubber insulation, 1.2 meters long, and solder it to the remaining ends of the coil and also isolate.
Then you need to find a suitable case for the coil, it can be bought ready, or pick up a suitable diameter plastic plate, etc.
We put the coil in the body and fix it there with thermoglue, also fix our adhesions and wires on the conclusions. You should get something similar:
Then the case is glued, or if you used a plastic plate or pallet, it is better to fill it with epoxy resin, it will give your design additional rigidity. Before you paste the body, or fill it with epoxy resin, it is better to conduct intermediate health tests! Since after the glue, there is nothing to fix!
To attach the coil to the bar of the metal detector, you can use this bracket (it is quite inexpensive), or make its own likeness.
By the second end of the wire, we solder the connector, and our coil is ready for use.
In the trial of such a coil from the metal detectors of Koschi 5I the following data were obtained:
Iron Gate - 190 cm
Casca - 85 cm
Coin 5 braids of the USSR - 30 cm.
A large coil for the pulsed metal detector with its own hands.
Here we will describe the way of making a depth coil of 50-70 cm, for pulse metal detectors. This coil is good for finding large metal targets at great depth, but it is not suitable for finding fine metal.
So, the process of making a coil for pulse metal detectors:
We make a cure. To do this in any graphic program, we lick our sleuth, and print it in the amount of 1:1.
With the help of a lectern, draw the outline of our coil on a sheet of plywood or DSP.
We enter the perimeter of nails, or twist screws (screws must be wrapped with tape, so that they do not scratch the wire), in a step of 5 - 10 cm.
Then wind on them winding (for the metal detector Clone 18 -19 turns) winding enamel wire 0.7-0.8mm, you can also use a multi-dwelling insulated wire, but then the weight of the coil will turn out a little more.
Between the cloves, winding pull cable ties, or tape. And smear the free areas with epoxy resin.
After hardening the epoxy resin, remove the nails and remove the coil. We remove our screeds. At the ends of the coil we draw conclusions from a long long long wire. And wrap the coil with fiberglass, with epoxy resin.
To make the crudoba, you can use a polypropylene pipe with a diameter of 20 mm. Such pipes are sold under the name “Pipes for thermowelding.”
You can work with polypropylene with an industrial hairdryer. It should be heated very carefully, because at 280 degrees the material decomposes. So, take two sections of the pipe, at one of them heat the middle, dig a hole through, expand it so that the second pipe crawls into it, heat the middle of this very second pipe (continuing to maintain the middle of the first in a hot state) and insert one into another. Despite the complex description, it does not require special dexterity - I succeeded the first time. Two heated pieces of polypropylene are glued to death, their strength can not worry.
Preheat the tips of the cross and cut them with scissors (heated polypropylene is well cut) in order to get “drains” for winding. Then insert the cross inside the winding and, alternately heating the tips of the cross with notches, “seal” in the last winding. When putting a winding on the cross, you can pass the cable through one of the pipes of the cross.
From a section of the same pipe we make a plate (the method of ivy in a hot state), bend it with the letter “P” and weld (again in hot form) to the middle of the cross. Drill holes under all your favorite bolts from the toilet cover.
In order to give extra strength and tightness fill the remaining cracks with all sorts of sealants, wrap dubious places with fiberglass with epoxy, finally wrap all the tape.
what does discrimination mean on a metal detector
Very powerful yet simple home made metal detector DIY
Simple metal detector on two chips NE 555
Smartphone Homemade metal detector
Tesoro Tejon vs Garrett ACE 250 discrimination test
Very powerful yet simple home made metal detector DIY
Simple metal detector on two chips NE 555
Smartphone Homemade metal detector
Tesoro Tejon vs Garrett ACE 250 discrimination test
Video how to make a metal detector
Where to look for a metal detector
Where to look with a metal detector
Where to dig with a metal detector by law
Where to find a metal detector
Where to look for a metal detector
Where to find a metal detector
What a metal detector is for
How to choose a metal detector
How to choose a metal detector to search
How to look without a metal detector
How to look for a metal detector
What's the name of the metal detector
How to find gold metal detector
How to find metal detector
How to set up a metal detector
How to set up a metal detector
How to set up a garrett metal detector
How to set up a metal detector x terra 705
How to set up a metal detector garrett
How to set up a metal detector
How to check the metal detector
How to pass a metal detector
How the metal detector works
As a metal detector itself
How to make a metal detector at home
How to make a reel on a metal detector
How to make a metal detector pirate
How to make a metal detector with your hands at home
How to make a powerful metal detector
How to make a simple metal detector
How to make a homemade metal detector
How to assemble a metal detector pirate
Stores where metal detectors are sold
Metal detector for gold how to choose
Metal detector how to choose to search for gold
What to find a metal detector
What they find as a metal detector
What is a metal detector
Where to look for a metal detector
Where to look with a metal detector
Where to dig with a metal detector by law
Where to find a metal detector
Where to look for a metal detector
Where to find a metal detector
What a metal detector is for
How to choose a metal detector
How to choose a metal detector to search
How to look without a metal detector
How to look for a metal detector
What's the name of the metal detector
How to find gold metal detector
How to find metal detector
How to set up a metal detector
How to set up a metal detector
How to set up a garrett metal detector
How to set up a metal detector x terra 705
How to set up a metal detector garrett
How to set up a metal detector
How to check the metal detector
How to pass a metal detector
How the metal detector works
As a metal detector itself
How to make a metal detector at home
How to make a reel on a metal detector
How to make a metal detector pirate
How to make a metal detector with your hands at home
How to make a powerful metal detector
How to make a simple metal detector
How to make a homemade metal detector
How to assemble a metal detector pirate
Stores where metal detectors are sold
Metal detector for gold how to choose
Metal detector how to choose to search for gold
What to find a metal detector
What they find as a metal detector
What is a metal detector
Comments & Responses
Leave a Reply
Your email address will not be published. Required fields are marked *
Comment
Leave a Reply
Your email address will not be published. Required fields are marked *
Comment
Name *
Email *
Website
What is a metal detector and how it works
How the metal detector works and more for beginners
What is a metal detector and how does it work?
How manual and arched metal detector works
Best metal detector for gold
What can be found with a metal detector?
What can be found with a ground metal detector
Options for balancing the ground of metal detectors
What benefits can be brought to treasure hunters of downpours
What can you find with a metal detector?
How to use a metal detector and what to find
What can i find with a metal detector?
Looking for a treasure without a metal detector
Finds that can be made with a metal detector
Is it possible to find a treasure in Estonia and what to do if something valuable has fallen into your hands?
Named places where in the suburbs with a high probability you can find a treasure
What and where can be found with a metal detector?